OTT development with Roku
OTT stands for “over-the-top” and refers to media content streamed directly to customers over the internet. It’s the most popular form of consuming media entertainment at homes today and the future.
We’ll be looking at this today by getting started in developing in the Roku platform. The Roku Publishing Platform lets developers and content creators have a complete solution for growing an audience directly and monetizing it through subscriptions, ad-suport, in-app purchases, etc.
Some of the topics we’ll discuss today are:
- Development overview
- Application entry points
- User interactions and event handling
- Content metadata
- Manifest file
- Developer environment setup
- Packaging
- Basic Roku application development
- Debugging
Development overview#
Roku is an open streaming platform, for content publishers and developers interested in growing their audience. The Roku OS was purposely built for streaming in all the Roku devices (this includes the players and televisions). The applications that run in the Roku platform are the channels, which stream the media content.
Channel development#
To develop a custom channel in the platform, we use Brightscript (see language references ), a script language purposily built for the Roku OS and SceneGraph, a UI framework.
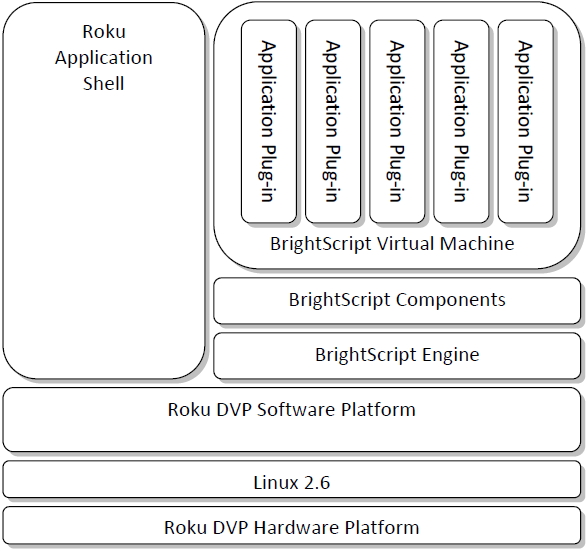
The diagram above provides a higher-level overview of the main system components of Roku.
- Applications are dynamically loaded at runtime
- Applications have a unique context in the Brightscript VM
- Applications are “sand-boxed” and thus run isolated from the outer system
- The script only have access to the platform resources that are exposed to the scripting layer as BrightScript components
- There’s a wide range of built-in elements and platform components
User interface elements#
BrightScript components are provided through the BrightScript SDK and these provide networking, video playback, user interface and data management. Objects in the Roku SDK are split into two primary areas:
- Core objects - Fundamental objects that exist on all Roku platforms and device independent
- Platform objects - Objects that are platform specific, such as the Roku streaming player
The development process to create an application for the Roku platform consist of:
- Writing a BrightScript application
- Packaging* the application and related resource files
- Deploying to the platform
- During the
developmentphase, the packaging is a structured ZIP file, while forproduction, tooling is provided to create a signed and encrypted package application.
During runtime the player will enumerate the installed applications, and display them on the main menu. When selected by the user(s), the scripts are loaded and control passed to the application. When the application is exited, the script process is terminated and the control passed back to the UI “shell”.
The SDK UI objects are SD/HD aware and will automatically display in the correct mode.
There are three possible modes:
- 4:3 standard-definition (480i/p)
- 16:9 anamorphic widescreen (480i/p)
- HDTV (720p)
Application entry points#
These are reserve fn names that are used as entrey points to the channel.
RunUserInterface is the default entry point which is called when a channel is selected on the Roku Home Screen.
Main when no RunUserInterface, the Main() fn is called.
When a channel is launched and on of the fns mentioned above is called, the aa (associative array) passed argument contains a “source” named paramenter. That represents the path the channel was launched from.
RunScreenSaver callend to launch a screensaver
User interactions and event handling#
Roku SDK UI objects provide an event oriented model for user interaction. The way it works is that instead of handling all the events received by the application, the UI elements handle it and send higher level events to the script. For more details check the event-loops documentation, here .
Content metadata#
The content metadata is stored in an associative array by the script and provided to the various screen objects as needed for display.
There are two ways to specify stream content metadata:
- data.Stream - used when there is one stream URL, typically an HLS (HTTP live streaming) or smooth streaming manifest URL.
- data.Streams - used when you have a set of fixed bitrate streams. This is typically the case for non-adaptive MP4 streams, in which case multiple variants are specified to simulate true adaptation.
The content metadata can be defined by different type of attributes.
- Descriptive attributes (ContentType, Title, Description, SD|HDPosterUrl, StarRating, etc)
- Digital rights management DRM (appData, encodingKey, encodingType, etc)
- Playback configuration (Live, Url, Stream, StreamFormat, PlayDuration, SubtitleUrl, etc)
- CDN switching
- SceneGraph certificate
- Playback control (MinBandwidth, FullHD, FrameRate, etc)
- Track ID
- roListScreen (SDBackgroundImageUrl, HDBackgroundImageUrl, etc)
- roImageCanvas
- TextAttrs (Color, Font, TextDirection, etc)
- Rating attribute icons
References:
- SceneGraph - build a Channel online video course
Manifest file#
The root level of all Roku channels must contain a Manifest file (pkg:/manifest), similar to mobile app development this contains important attributes for the application/channel. Examples:
- Name and version number of the application
- Channel icon
- Splash screen image
Example of a manifest file:
# Channel Details
title=HeroGridChannel
subtitle=Roku Sample Channel App
major_version=1
minor_version=1
build_version=1

# Channel Assets
mm_icon_focus_hd=pkg:/images/channel-poster_hd.png
mm_icon_focus_sd=pkg:/images/channel-poster_sd.png

# Splash Screen + Loading Screen Artwork
splash_screen_sd=pkg:/images/splash-screen_sd.jpg
splash_screen_hd=pkg:/images/splash-screen_hd.jpg
splash_screen_fhd=pkg:/images/splash-screen_fhd.jpg
splash_color=#808080
splash_min_time=0
# Resolution
ui_resolutions=fhd

confirm_partner_button=1
Find the documentation available here .
File system#
Application storage is available through the following ways:
- tmp - available throughout the application session only, cleared on exit, files can be read and written
- cachefs - data persists until the system determines that another channel needs storage, file handling has read and write permissions
- pkg - readonly, files included in the application package only
- USB device - readonly, access USB media
- registry - limited to 16kb per channel, data is read/write
Find more details here
Developer environment setup#
Here’s how to get you started developing a channel, but first let’s look at some requirements:
- Roku device
- Roku account, here
- Enrollment in the developer program, here
- Code editor (the Roku team recommends the Eclipse IDE)
Assuming that you have a Roku device, account and enrolled in the developer program, access your Roku device and press the following buttons through your remote control:

The developer setting screen displays the URL of your Roku device, write the URL down and then enable the installer.
For example:
http://192.168.0.38

Username: rokudev
After you complete the enable process and the Roku restarts, open the Development application installer panel by typing the Roku address in a browser:
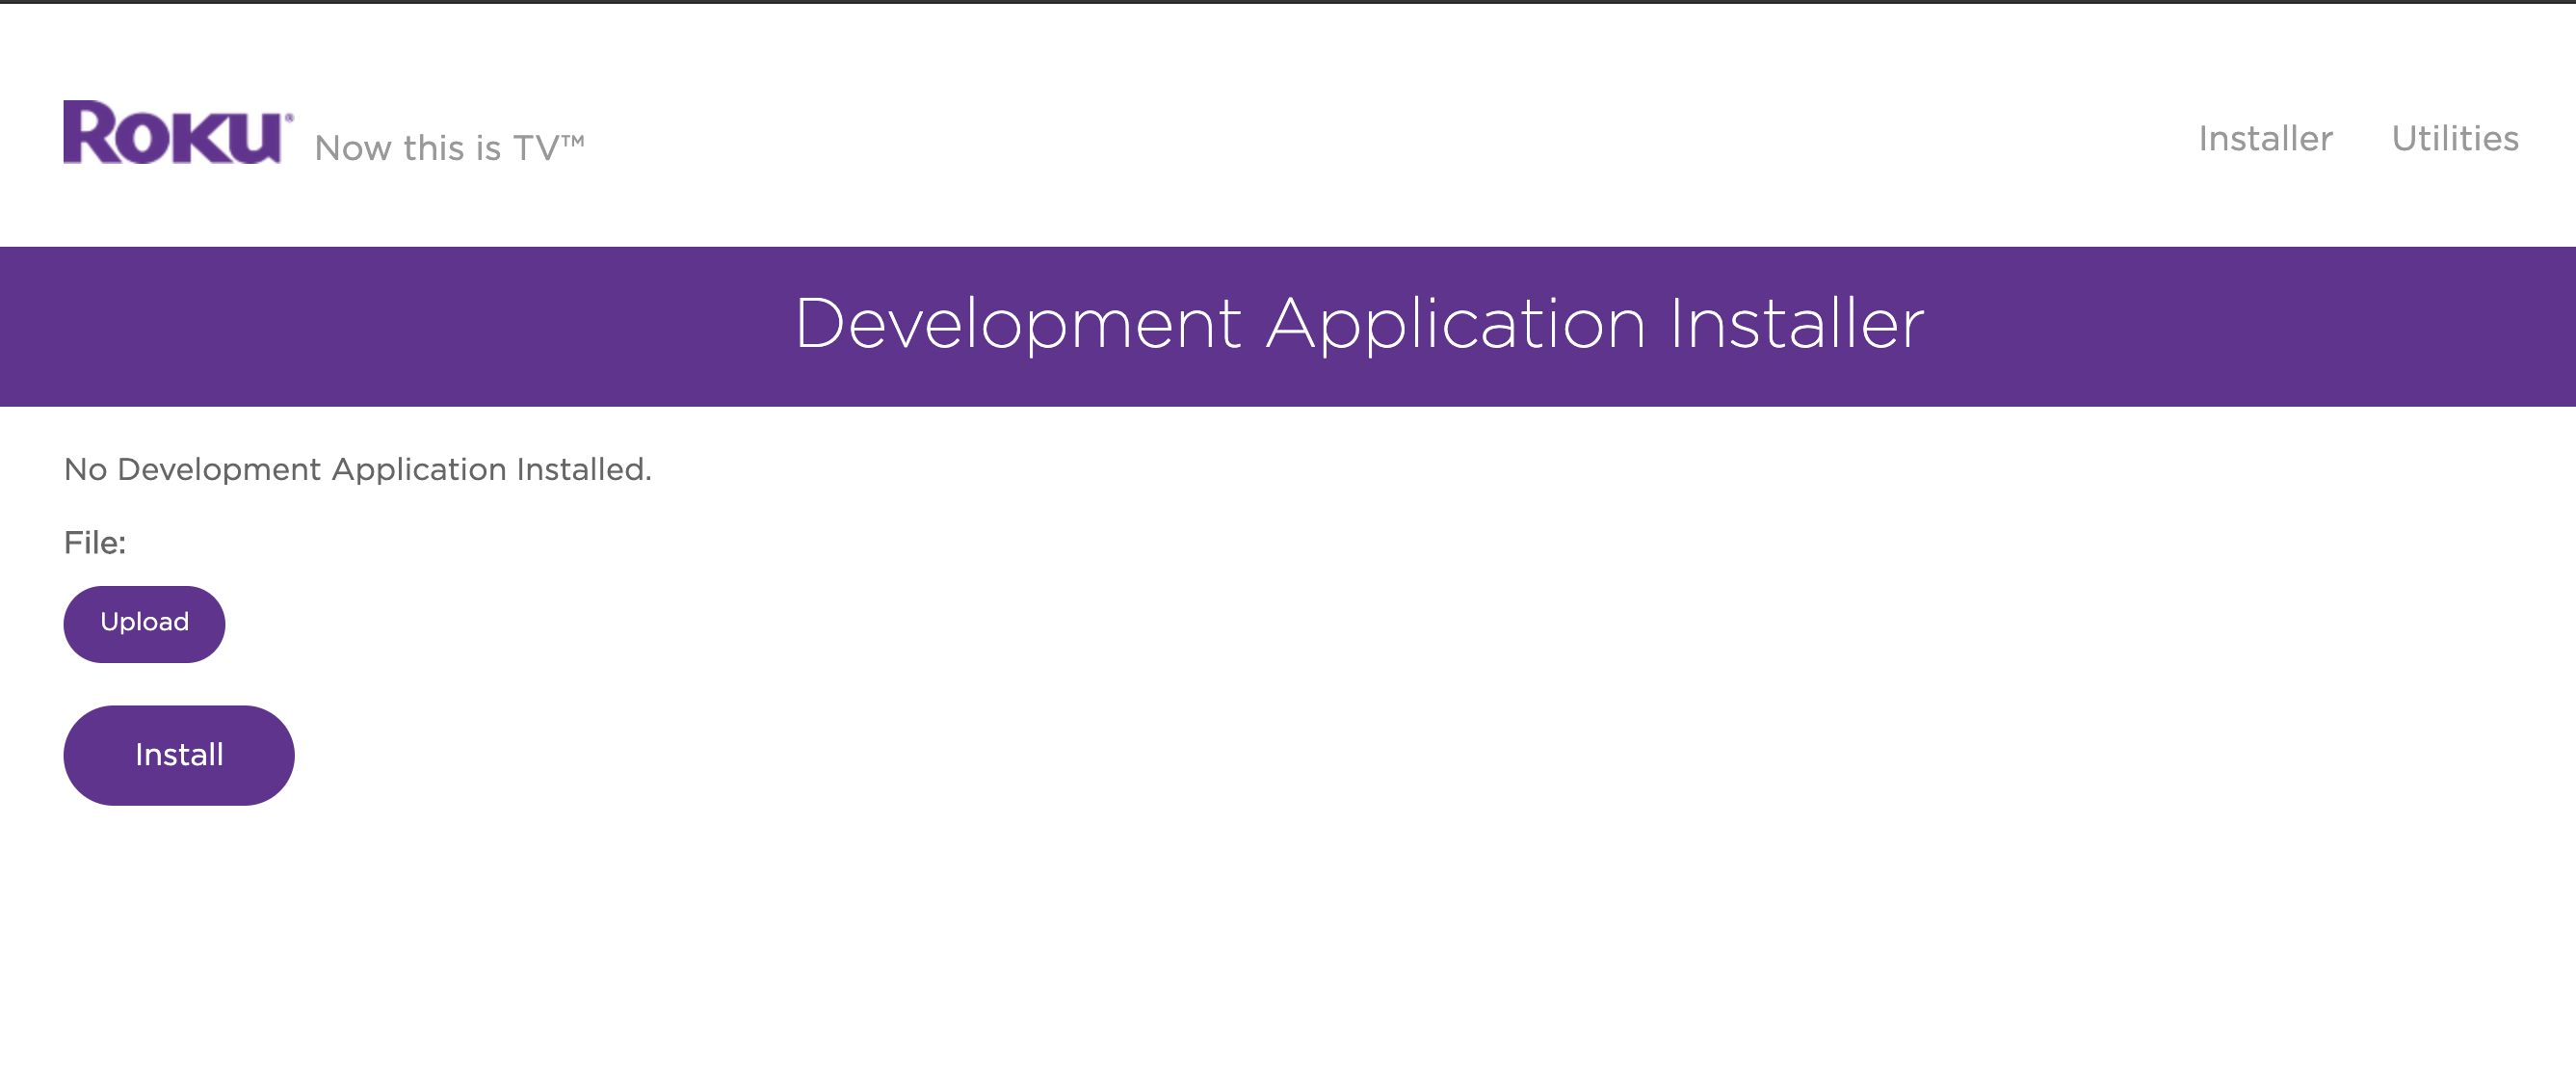
Use the username and password you’ve used during the enable process (rokudev / ****).
You can now install a sample application to test. Download the Roku sample channel
, use the Github repository, or use the directly link here
for the Hello world example and extract and find the distribution zip file in the dist directory.
To complete, use the upload option and after install.
Once upload you should see:
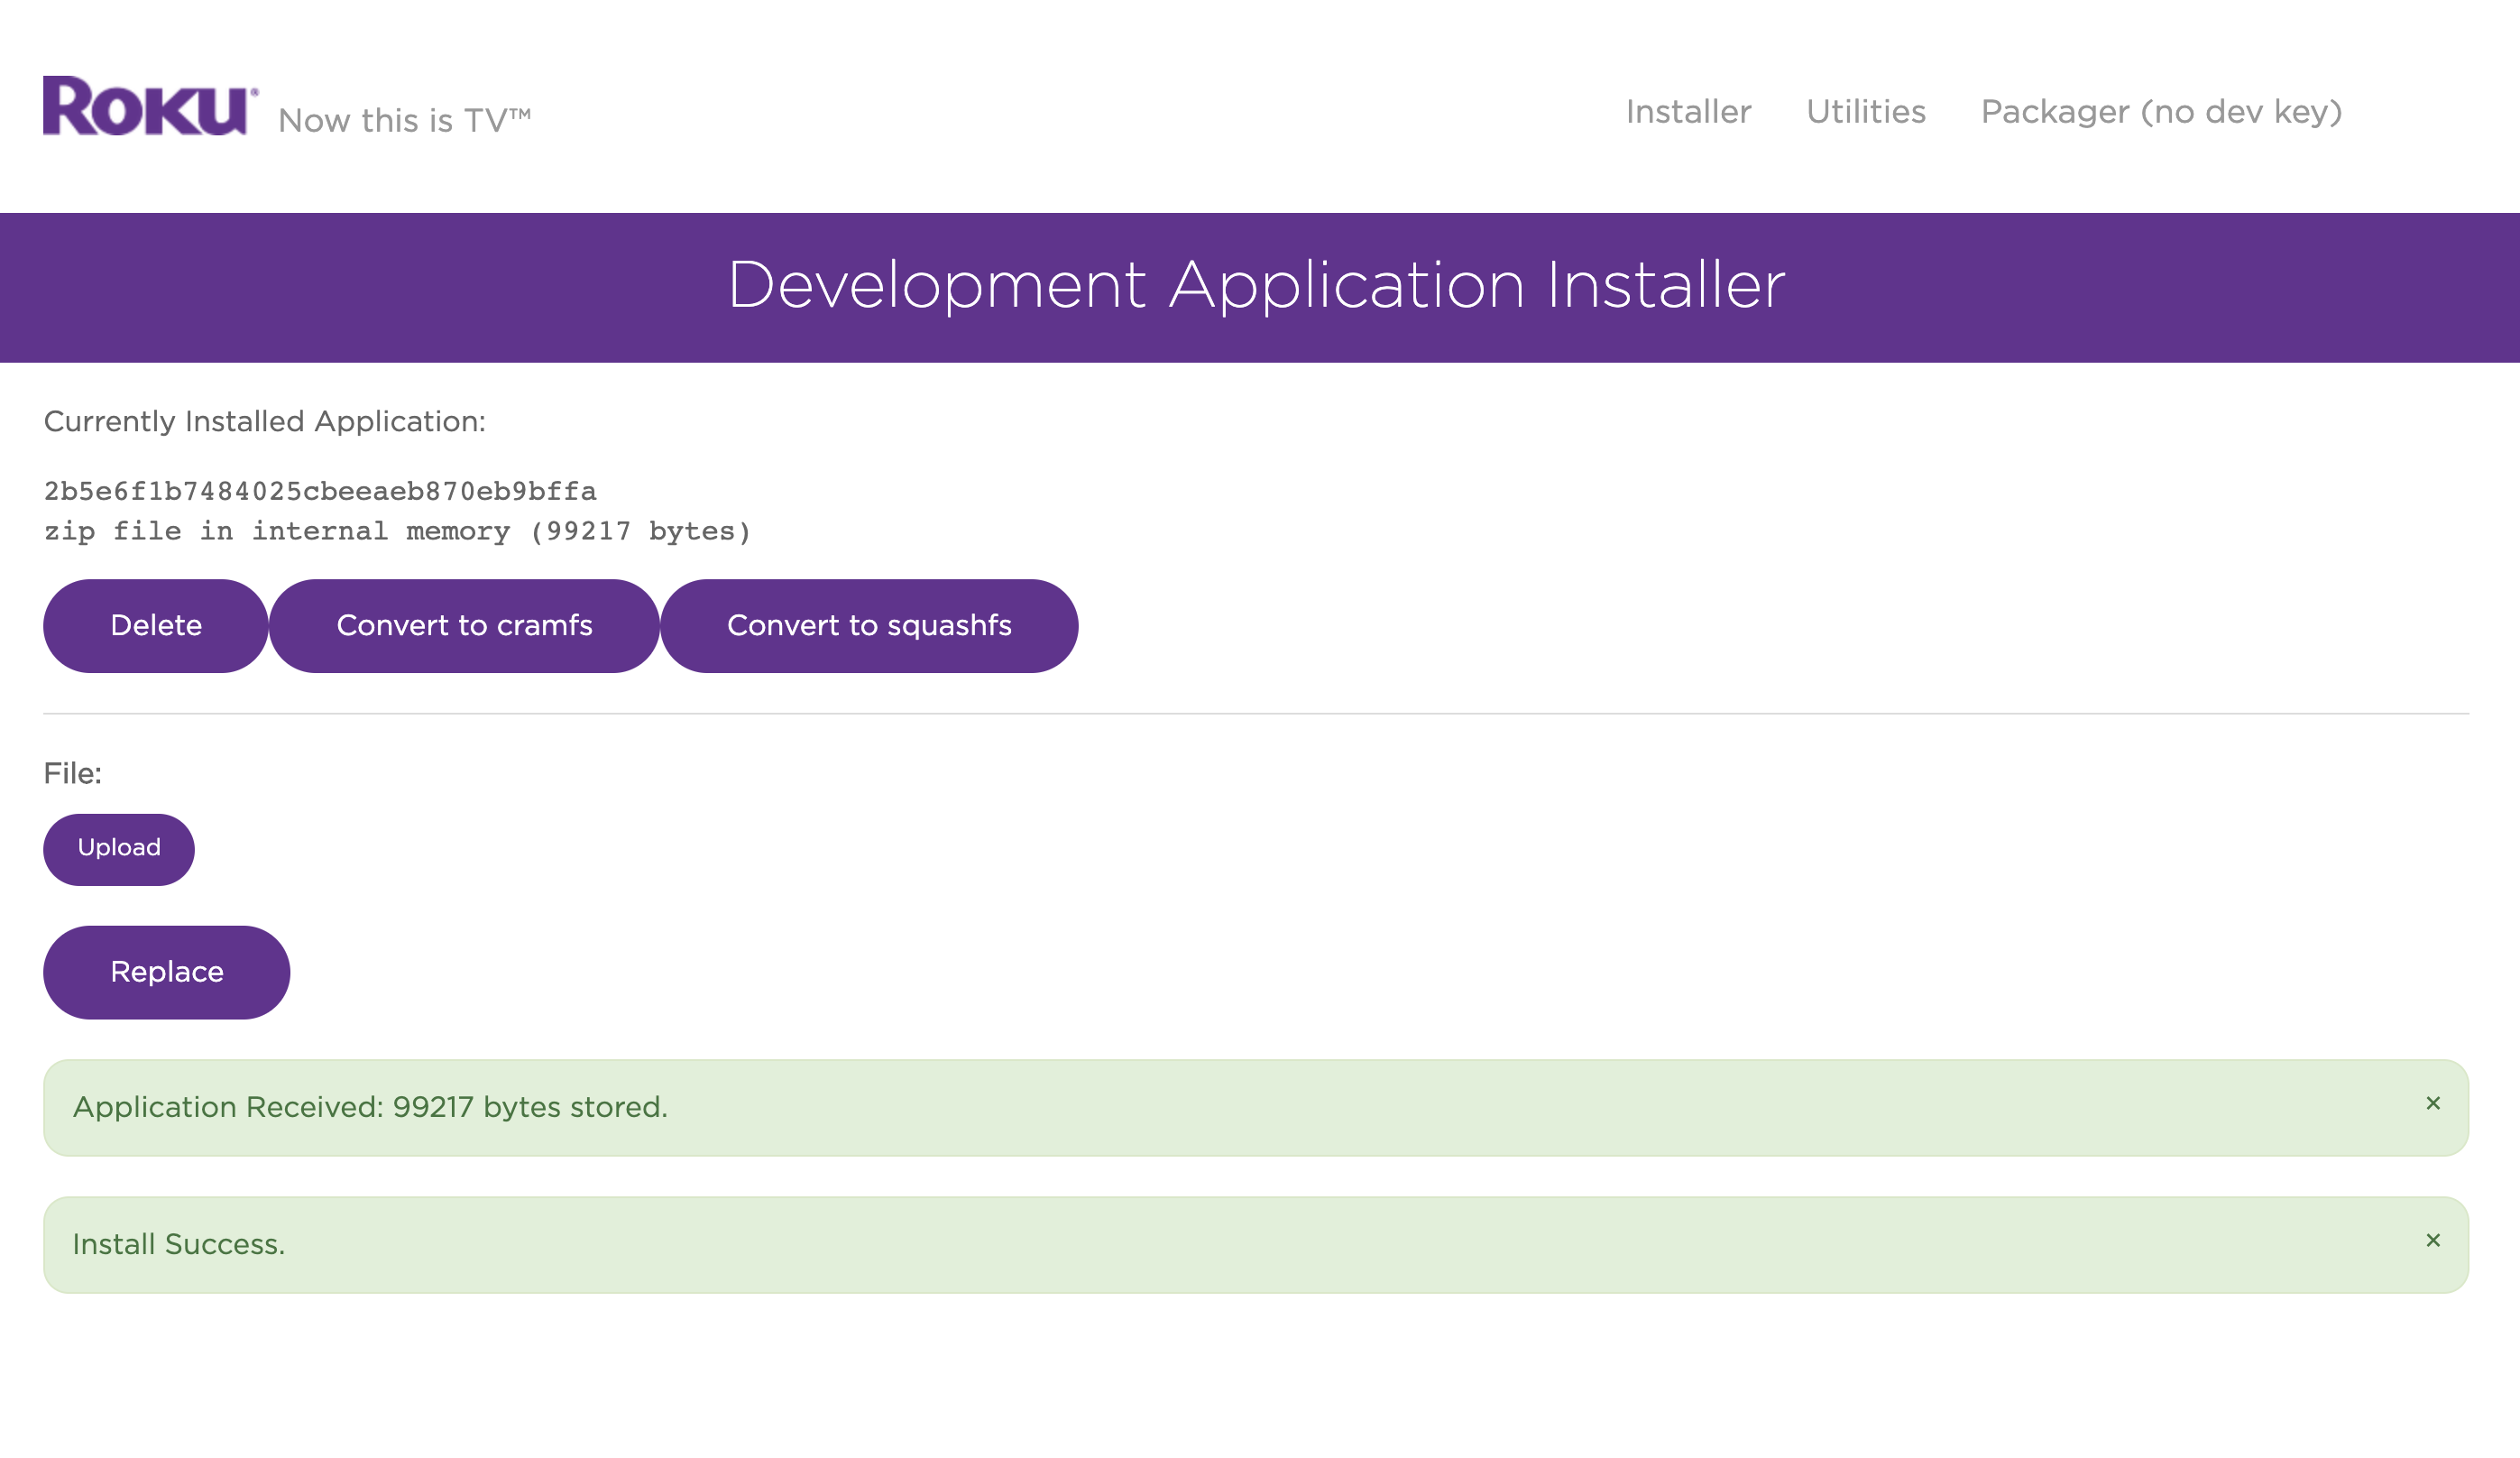
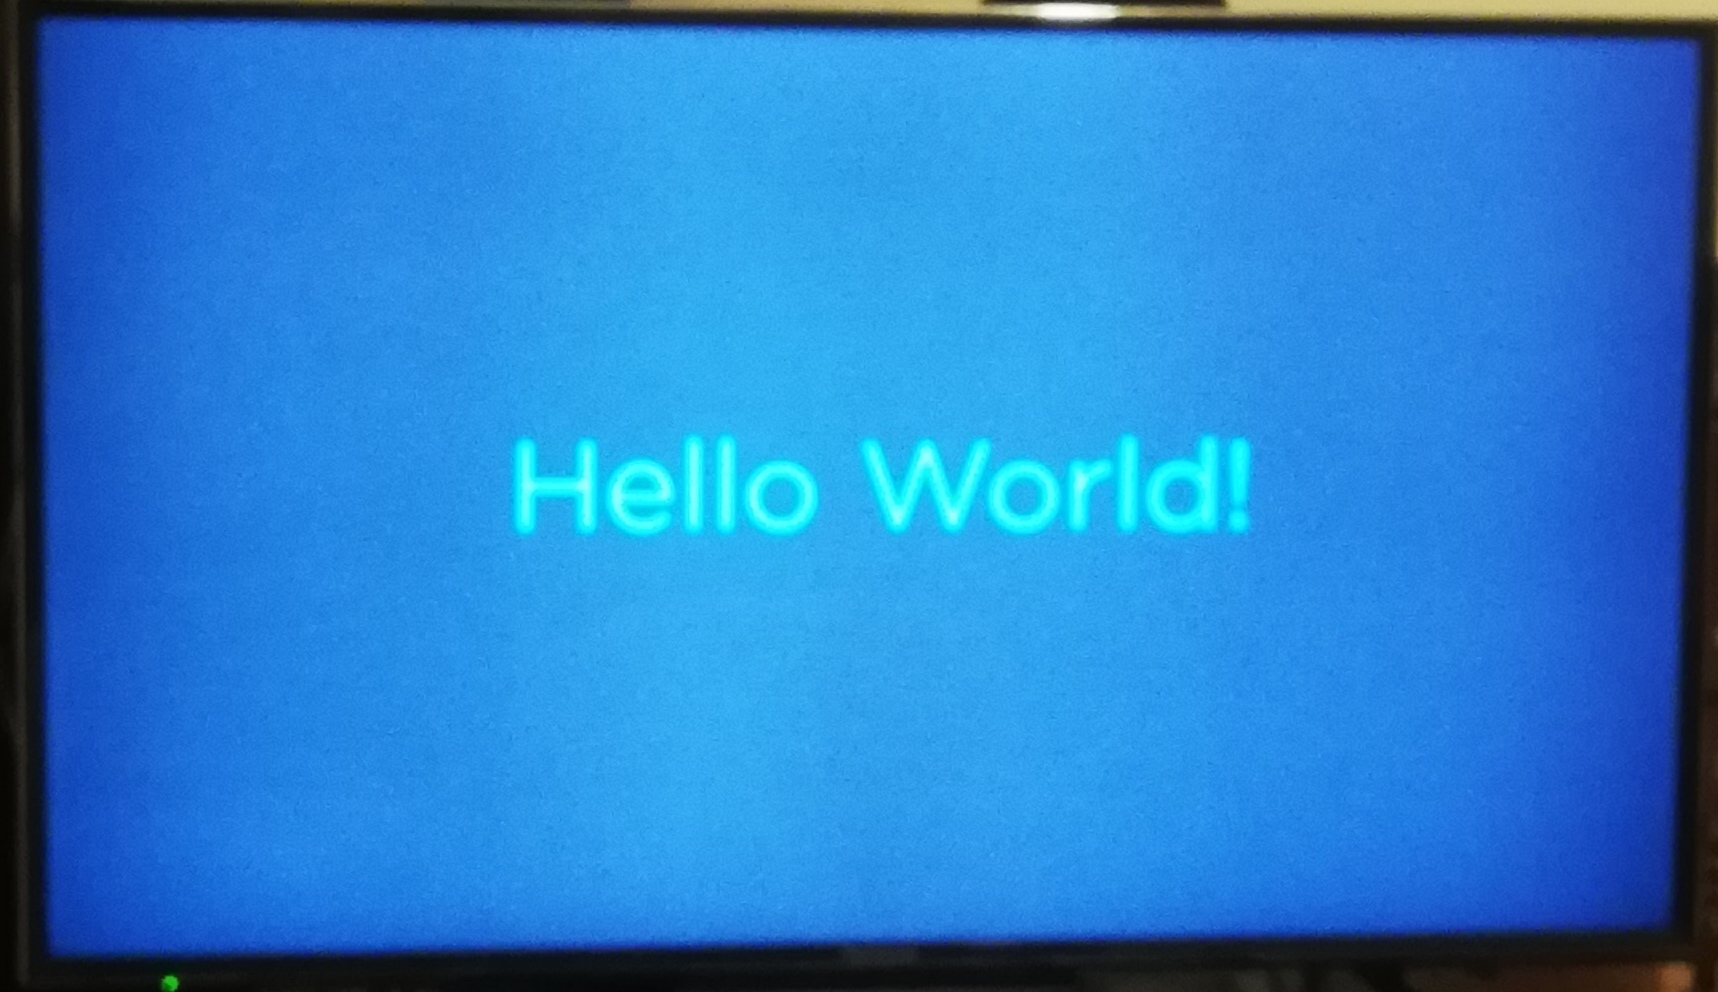
Your Roku should be updated and display the application in the main screen, showing a big “Hello World”.
A few important notes:
- the application installer only accepts a channel contained in a ZIP file, the process is called “sideloading” the channel (first you sideload the channel, then you package it. Learn more about packing channels, here ).
- a signed package file is what Roku distributes through the Channel Store.
- channels are limited to a max. of 4MB in size
- typical applications have a max. size of 300kbs, being that images take the most space
Developer Settings for examining a channel#
Developer Settings contains several tools essential for Roku channel development:
- Package Inspector - utility to inspect the details of the package (developer ID, creation date, etc)
- Rekey Utility - utility allows you to replace the signing key on the current Roku device with a key from an existing package. This utility is most useful when developing multiple channels on the same Roku device.
- Screenshot Utility - enables developers to capture images of sideloaded channels. These images can be uploaded with a channel submission to showcase in the Channel Store after publication.
- BrightScript Profiler - Gathers important metrics such as CPU usage, “wall-clock” time (the real world time for something to execute), and the number of times functions are called during the execution of your channel.
Application packages#
The application packager takes a sideloaded channels, signs it, and generates an encrypted package for publication. The process of packaging a channel uses cryptography hardware built-in into the Roku device, that creates an encrypted package that can be easily and safely distributed on Roku devices.
This steps require a dev key and instructions on how to generate one can be found here .
A quick guide on this for macOS is:
In your terminal run the CMD telnet 8080, if you don’t have telnet install it install through homebrew (brew install telnet)
Run the command
genkeyand wait until the key is generated to sign packages.
>genkey
..........................+++++
.......................................................................................+++++
Password: XXXXXXXXXX
DevID: XXXXXXXXXXXXXXXXXXXXX
- Make note of the developer ID and password
- the developer ID and password are required anytime the code is updated and needs to be repackaged
- it’s a good practice to generate a new signing key for each channel created unless you explicitly want to share registry information between channels
Packaging the side loaded channel#
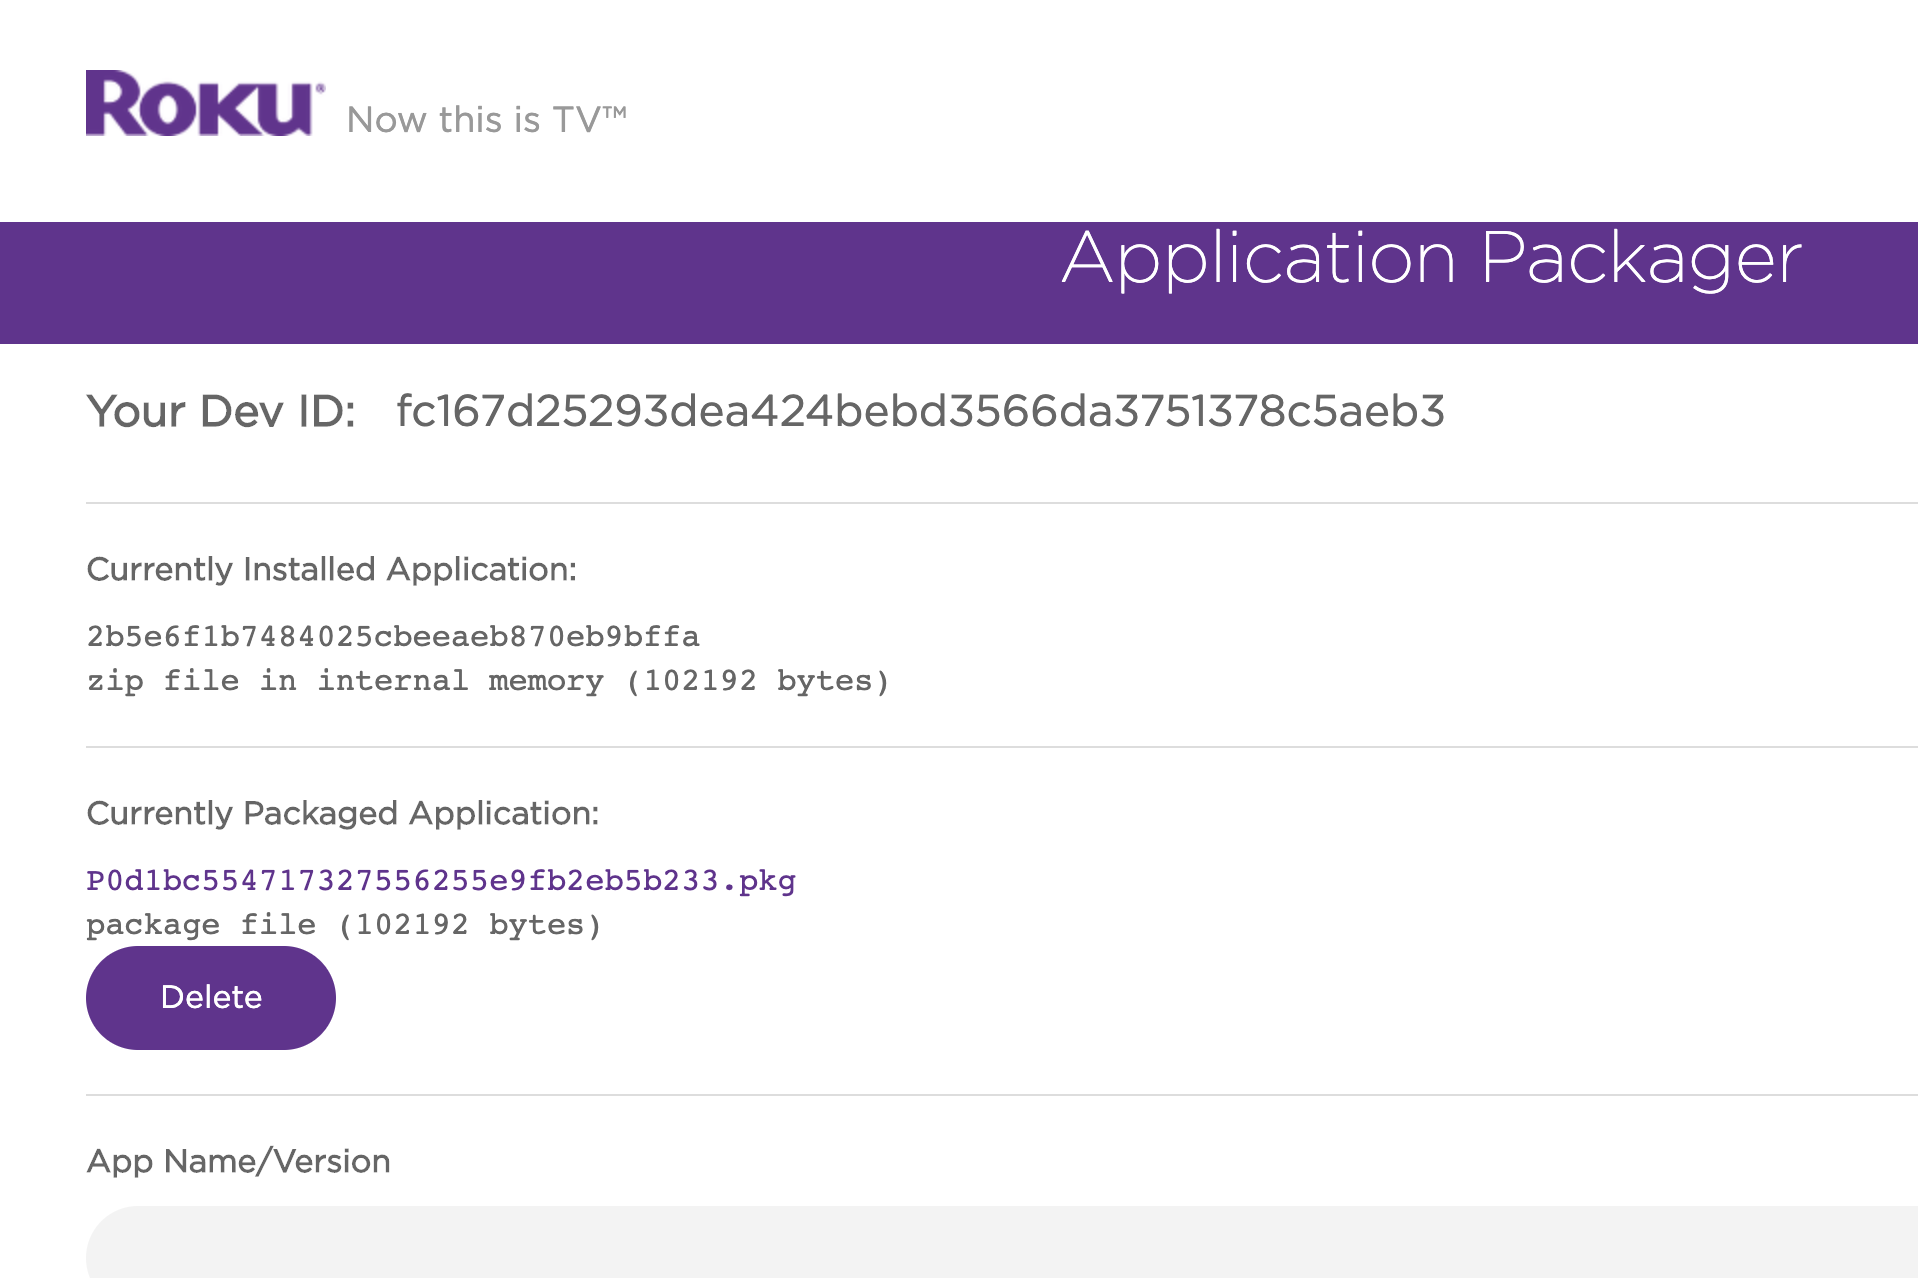
Now that we have a signing key, the development application installer once refreshed, should have a new option in the top right corner (if not you have to go through the previous steps to generate the signing key).
The packager is self explanatory. Fill the form with the desired data, the application name and version and the password you got when the signing key was generated.

Once complete, a signed package can be downloaded using the .pkg link.
Warning When developing multiple applications, it is good practice to sign each package with a different key. This ensures registry entries are not shared between channels. To sign different packages on the same device, it will have to be rekeyed.
Channel publishing#
Once the application is packaged, tested and ready for deployment, you use the developer dashboard to publish it to the world. The documentation is available here
Some prerequesites that should be noted and taken into consideration:
- Design and User Experience Guidelines, here
- Pre-certification Check List, here
- Signed Package, here
- Publish channel, here
Hello world sample channel#
Let’s take a look into the sample channel directory file structure, to understand how the most basic application is created.
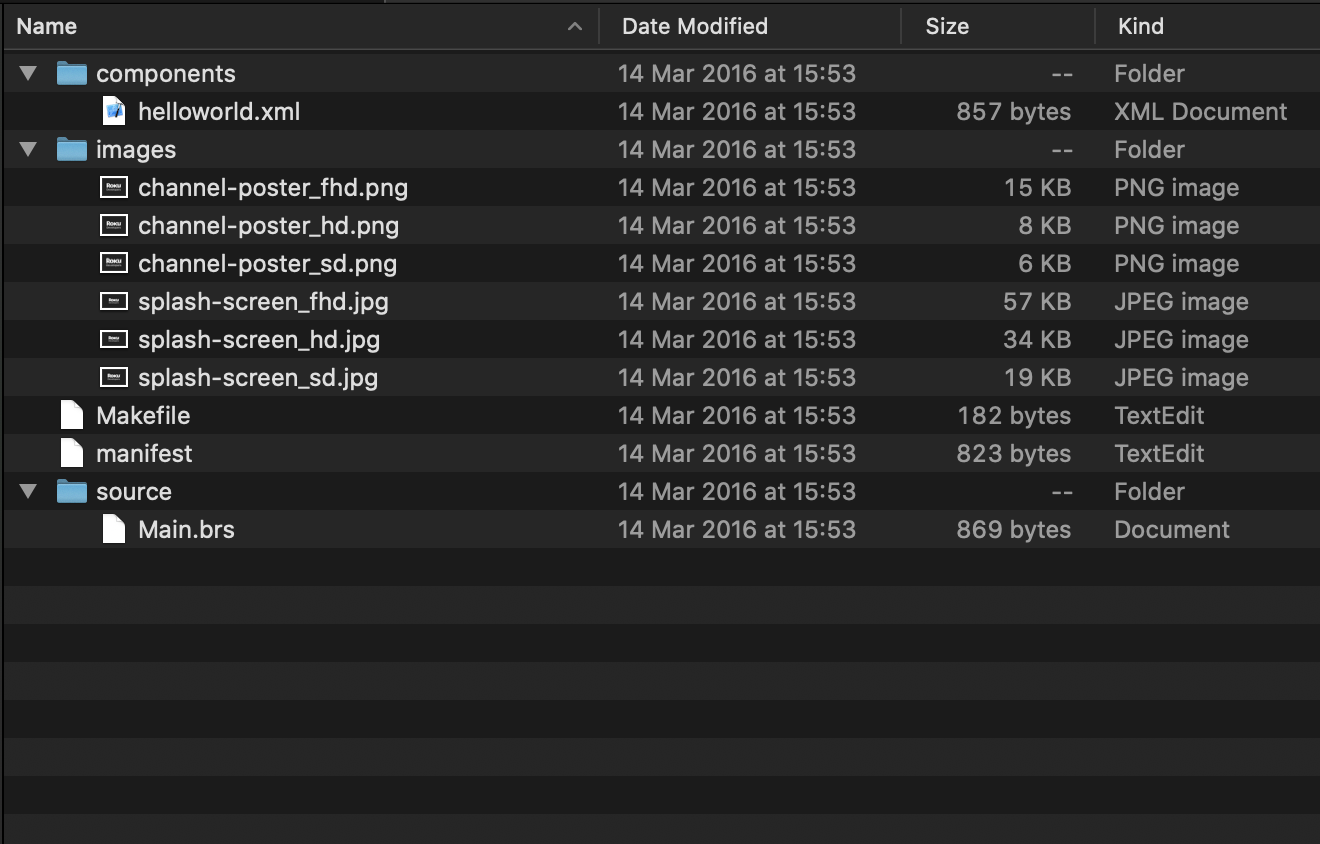
- Components - directory for the SceneGraph layout files (SceneGraph XML files)
- Images - channel artwork (generally there are different files, for different resolutions, such as splash screens, poster artwork, menu icon, etc)
- Makefile - optional utility for installing channels
- Manifest - attributes and versioning details for the channel
- Source - the source files for the application, for the hello world app
main.brsthe entrypoint
As an example, if we look into the SceneGraph file helloworld.xml, we can identify the “Hello World” text and how its positioned:
<?xml version="1.0" encoding="utf-8" ?>
<component name="HelloWorld" extends="Scene">
	<children>
      <Label id="myLabel"
      	text="Hello World!"
      	width="1280"
      	height="720"
      	horizAlign="center"
      	vertAlign="center"
      	/>
    </children>
<!-- BrightScript Portion -->
<script type="text/brightscript" >
<![CDATA[
  '**
  '** Example: Edit a Label size and color with BrightScript
  '**

  function init()
    m.top.setFocus(true)
    m.myLabel = m.top.findNode("myLabel")

    'Set the font size
    m.myLabel.font.size=92

    'Set the color to light blue
    m.myLabel.color="0x72D7EEFF"

    '**
    '** The full list of editable attributes can be located at:
    '** http://sdkdocs.roku.com/display/sdkdoc/Label#Label-Fields
    '**
  end function
]]>
</script>
<!-- End of BrightScript Portion -->
</component>
Debugging code#
Documentation on how to debug code can be found here .
Roku application development#
The following lessons are based in the community crash course .
- Create a app directory,
myapp - Create a file called
manifestand include:
# This is here because this file must be larger than zero bytes.
- Open
myappand create a sub-directory calledsource - Create a new file
main.brsand include:
sub main()
? "Hello World."
end sub
In the root, run the zip command to create a new package:
zip -FS -9 -r <package-name> *
A quick breakdown of the flags we passed in the zip command :
-FS, --filesyncSynchronizes the contents of an archive with the files on the OS-r, --recursive-pathstravel the directory structure recursively-9indicates the slowest compression speed from 0 (no compression) to 9 (optimal compression, ignores the suffix list), The maximum compression option -9 also attempts compression on all files regardless of extension.
Before uploading the package, open the debugger (very important to note, as documented, the debugger runs in the port 8085):
telnet 192.168.0.xxx 8085
Use the Roku application installer to “sideload” (upload the app) or execute the script bellow (this was published in SO by Nas Banov, it does a POST request to the Roku application installer url, then pipes the HTML response and filters to only get us the text response). I’ll create a script later based on this principles.
curl -f -sS --user rokudev:password --anyauth -F "mysubmit=Install" -F "archive=@bundle.zip" -F "passwd=" http://192.168.0.38/plugin_install | python -c 'import sys, re; print "\n".join(re.findall("<font color=\"red\">(.*?)</font>", sys.stdin.read(), re.DOTALL))'
In the telnet session, our debugger should output:
------ Running dev 'xxxxxxx' main ------
Hello World.
11-14 21:10:00.373 [beacon.signal] |AppExitInitiate -----------> TimeBase(796 ms)
11-14 21:10:00.373 [beacon.signal] |AppExitComplete -----------> Duration(1 ms)
At this point we only got a message in our telnet session. We can change our manifest file, to include a few images (check the path to find where to include the images). I’ve used placekitten to generate some images for me
- channel icon - http://placekitten.com/290/218
- splash hd - http://placekitten.com/1280/720
## Channel Icons
#### Image size for mm_icon_focus_hd: 290x218px
mm_icon_focus_hd=pkg:/images/channel_logo_hd.jpeg

###  Splash Screen + Loading Screen Artwork
#### Image size for splash_screen_hd: 1280x720px
splash_screen_hd=pkg:/images/splash_hd.jpeg
Once the channel is “sideloaded”, you should see the icons and the splash screen.
Let’s add some metadata in the manifest file:
##   Channel Details
title=Cats channel
major_version=1
minor_version=0
build_version=0

## Channel Icons
#### Image size for mm_icon_focus_hd: 290x218px
mm_icon_focus_hd=pkg:/images/channel_logo_hd.jpeg

###  Splash Screen + Loading Screen Artwork
#### Image size for splash_screen_hd: 1280x720px
splash_screen_hd=pkg:/images/splash_hd.jpeg

custom_field=hello_world
Also, update the main.brs entrypoint to display the meta fields in the manifest . And why not, included a handler to terminate the application as documented here .
sub main()
  ' Print information from Roku manifest
  app_info = createObject("roAppInfo")
  ? "App Title: ", app_info.getTitle()
  ? "App Version: ", app_info.getVersion()
  ? "Channel ID: ", app_info.getID()
  ? "isDev: ", app_info.isDev()
  ? "Custom Field: ", app_info.getValue("custom_field")

  '
  while(true)
    msg = wait(0, m.port)
    msgType = type(msg)
    if msgType = "roSGScreenEvent"
        if msg.isScreenClosed() then return
    end if
  end while
end sub
Once “sideloaded”, our telnet session debugger should’ve output:
------ Running dev 'Cats channel' main ------
App Title:      Cats channel
App Version:    1.0.0
Channel ID:     dev
isDev:          true
Custom Field:   hello_world
And the Roku channel should only terminate if we press the Home button. Brilliant!
Roku community tools#
The Roku community provides a project called BrighterScript, a superset of BrightScript. Its goal is to provide new functionality and enhanced syntax support to enhance the Roku channel developer experience.
Why is this important?
- Checks the entire projects for syntax and program errors without having to run on an actual Roku device.
- Catches syntax and program errors on compile time (transpiles code from BrighterScript to BrightScript) which would not otherwise appear until runtime
- Can be used as tool during continuos integration or a custom build pipeline
- Real-time syntax validation by using the CLI in
--watchmode
The language spec for BrighterScript can be found here .
BrighterScript#
Assuming that you have NPM or YARN installed, and that the project matches Roku’s guide.
In the current project you’re working or anytime you start a new project.
yarn init
Followed by adding a new package to the project
yarn add brighterscript
To complete, execute the command in the root
npx bsc
You can omit the npx but for that you’d have to install the package globally in your machine or user.
When the CMD is executed and no errors are found, a new package is created under /out/project.zip. You can customize this, so check the documentation for more detailed information
.
BSlint#
You might not be interested in the packaging phase and only the linter. BrighterScript supports plugins, as such a linter called bslint is provided. Find it here
. At time of writing the NPM package is not available, so you’ll have to git clone and NPM link locally, unless stated otherwise here
.
Roku-deploy#
Previously, a method based on cURL HTTP Post method was used to “side-load” our application into Roku’s, without having to do it manually in the Developer package installer.
The Roku Community provides a great tool for this, if you’re interested in using nodejs. Find all details here .
Let’s have a quick look:
yarn add roku-deploy
Followed by:
npx roku-deploy
You could omit the first CMD add and just run npx as it’d fetch the package for you.
Screenshot#
Check the Package Utilities in the Package install dashboard
TV Safe zone overlay#
https://github.com/rokudev/tv-safe-zone-overlay/blob/master/README.md